How to track the Vendor PO number on the customer Sales Order and Invoice in QuickBooks.

Solution – when you need to track Vendor Purchase Orders that are associated with individual customers (i.e. Sales Orders), reference the internal QuickBooks Vendor PO number  in a user defined field.

Also please read this post http://evarsys.com/qbenterprise/?p=40.

Create a user defined field on the customer card, called Memo, or Vendor PO#, or something else that makes sense to you.  I don’t think you want to call it Vendor PO number but you can name it anything you want. I suggest naming it “yourcompanyinitials”#.  For example, XYZ#.  This is your internal tracking number for the Vendor Purchase Order attached to the Sales Order.

Modify the Sales Order and Invoice form to display the Memo or XYZ# field.

On the Sales Order you then click on the drop down by Create Invoice and click Purchase Order.  Complete the PO for the vendor, do a CTRL C on the PO Number to copy. Click Save and Close on the Purchase Order.  Then back on the Sales Order click in the Memo or XYZ# field and CTRL V to paste.

The Memo or XYZ# will be updated on the customer card. Just click save.  This will over write each time and that’s fine. This updated user defined field will default on the next Sales Order or Invoice you create.  But don’t panic, you just blank it out or paste over it each time on the Sales Order or Invoice.

The Memo or XYZ# field will now print on the Sales Order, and transfer to the Invoice.

Modify the Open Sales Order Report by Customer to display the Memo or XYZ#.

Please contact us if you would like some help implementing this functionality.


Posted in QB Enterprise | Leave a comment

Our blog rules.

How to eliminate annoying spammers? Delete them!

Sorry, no spamming will be tolerated so all subscribers to the blog have been deleted. Because of the inconsideration of a few the many must suffer.  Please click Register to create a userid and password.  You will be emailed a password.  When you log in the first time you can change your password in your profile.  Hopefully we won’t have to delete all subscribers again and we can just monitor and block the subscribers that are spammers.

Our blogs are meant to be serious resources for comment on technology and a serious resource for people needing help on the products we sell and support.

All serious bloggers are welcome to register, comment, and seek additional support and comment from us.

Serious bloggers rule.  Spammers are stupid and cruel!

Posted in Blog rules | Leave a comment

Quickbooks how to eliminate some annoying popups.

Are you always closing the Live Community popup?

Go to Edit – Preferences – Desktop View.

When you launch Quicksbooks Help your screen is resized and the help screen is fixed
and takes up part of your window. By clicking Detach Help Menu you can then
drag the help menu around the screen and minimize it so it stays open but doesn’t
take up space on your open window.

Since these changes are made under My Preferences each user can have his/her on desktop setting and they do not have to be an Administrator or Full Access user to make
these changes. Only a Full Access user can change Company Preferences.

[facebook_ilike]

Posted in QB Enterprise | Tagged | 1 Comment

Importing data into Quickbooks

[facebook_ilike]

Let’s discuss several options. Please contact us if you would like assistance importing data into your software application.
Contact Us

In all cases you must make sure you have a current backup of the company file in case the import causes unexpected results and you need to restore.

1) IIF Files. This method is for Advanced users that know a good bit about Excel and formatting data for Quickbooks. To use this method you must first create the IIF format to use for the import.  Click on File – Utilities – Export – List to IIF.  Check the box for the category of import you want to do, example click Items List.  Click OK, give the file a name, example Item Import.IIF and save it to a folder you can access easily.  Launch Excel, then open the Item Import.IIF with Excel.  Open the file as Delimited, and Tab.  Then you can easily manipulate the item section !INVITEM to add you data.  Do not alter the headers in rows 1 and 2, column A, or the !INVITEM header row.  Save the Excel spreadsheet.  To import go to File – Utilities – Import – IIF Files.  Select the Excel spreadsheet and click OK.  The file will immediately begin to import.  Some consultants say not to use IIF files as they can sometimes cause file corruption in Quickbooks.

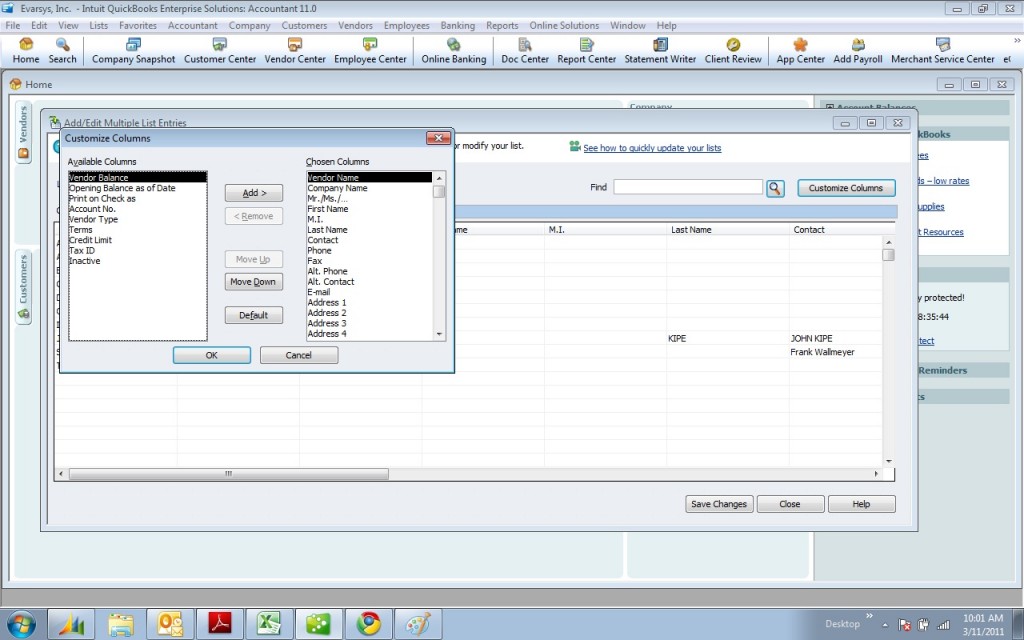
2) Add/Edit Multiple List Entries.  This is perhaps the easiest method.  Click on Lists, the Add/Edit Multiple List Entries. Select in the drop the type of list you want to work with; Customers, Inventory Parts, Non-Inventory Parts, Service Items, or Vendors. At the present time you cannot import the GL Chart of Accounts.

To customize the columns displayed and order of columns click on Customize Columns.  Once you have the columns in the order you want create and Excel spreadsheet and put those columns in the same order.  Populate the spreadsheet. Then it’s a simple matter of copying the entire column in Excel, then click in a blank cell box in QB and paste.

Once you have made all your changes to QB be sure to click on Save Changes.

You can click on any column heading to sort high to low, or low to high.  You can also right click in any populated cell, with blank cells below it and select Copy Down.
3) Guided Excel Wizard.  Click on File – Utilities – Import – Excel Files. In Step 1 select the type of data you want to import Customers, Vendors, Products I Sell.  In Step 2 a spreadsheet will be presented to you, fill in that data columns.  When done close the screen and you will be asked to Save and Add My Data Now, or I’ll Add the Data Later.  If you click Save and Add My Data now you must give the spreadsheet a name.  As soon as you give the file a name and click Save the import will begin.  In Step 3 you can view results and verify you data.  I don’t like option 3) much as it is very limited on what you can import.

4) Advanced Users. Click on File – Utilities – Import – Excel Files, then Advanced Excel.  This option is for slightly advanced users who can work with Excel.  First you need a copy of the Excel Example.xls file which you can download from this link. http://support.quickbooks.intuit.com/support/Articles/HOW12247

Build, copy and paste you data into the Excel Example.xls file which has four sheets.  Model your data by using their examples.

Select the name of the Excel file, then the name of the sheet.  For example select Example Item List.  This file has header rows is checked by default.
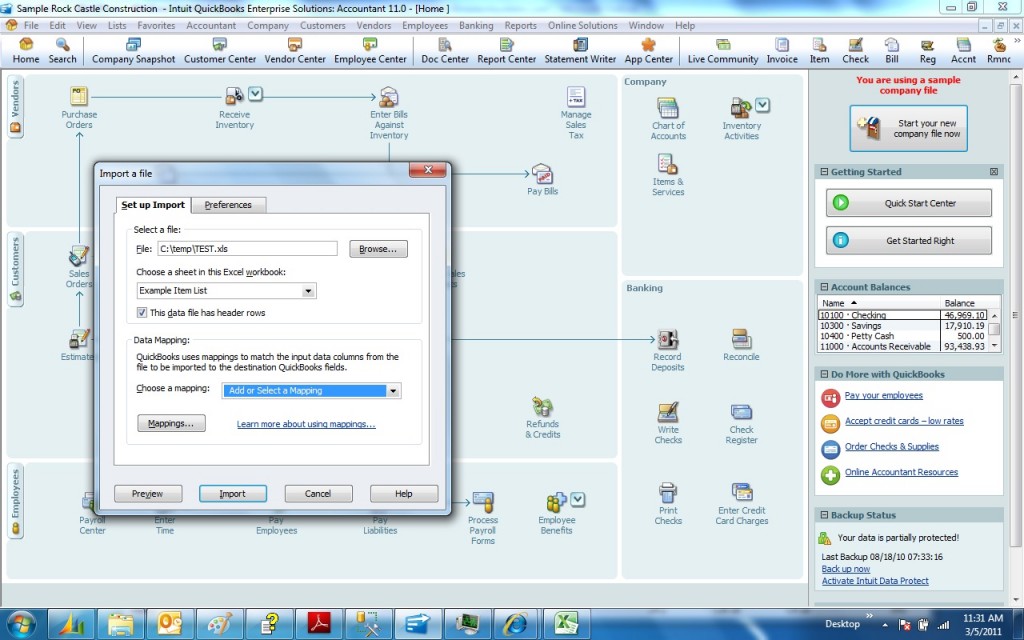
Next click on Mappings.  Select an Import Type, example Item List.  Map each field on the right, your Import Data to the QB field on the left.  Click Save As and give it a name. You can click Preview to preview your data and errors.  When ready click Import.
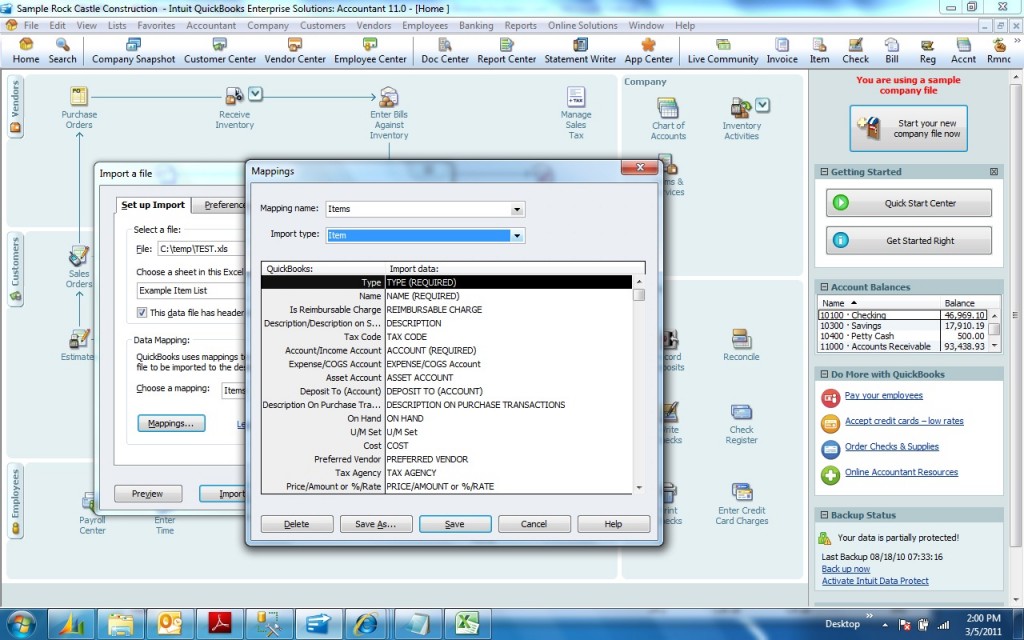
Notice that you have a tab for Preferences were you can better control how duplicates and errors are handled.

5) Transaction Pro Importer.  TPI 4.0 by Bay State Consulting is a good add-on for importing list data and transactions.  As it’s name implies it is primarily a transaction importer and we have had good success with the product and recommend it.  TPI requires a license for each computer or server and may not be the best choice if you run QB in a hosted environment.

6) Autofy.  Autofy by Propelware is the best solution to use in a hosted environment such as Right Networks.

[facebook_ilike]

Posted in QB Enterprise | Tagged | Leave a comment

Quick Books company file locked up.

What causes the quick books abort message for the company file?  Here is an example message you might get.

This is a common error and a known QB problem.  The problem could have many root causes ranging from a lost connection to the database server, a local pc hardware or software problem, etc.

The result is often a corrupted company file.  So, if you are hosting the QB company file on your server you must fix the problem.  If the QB and company files are hosted off premise then your hosting support team should fix the problem.

Here is the basic approach you must take to fix this:

1) Download and run the QB company file diagnostic repair tool.

     http://support.quickbooks.intuit.com/support/Articles/HOW12723

2) Delete the transaction log file and try to launch QB again.  Delete only the QBW.TLG file. It will look like this, company.QBW.TLG.

3) Finally if all else fails you must restore from a backup.

You should be doing full company file backups at the very least each night on a scheduled basis.  Multiple backups stored in multiple locations is a must.

Posted in Uncategorized | Tagged | 1 Comment

Quick Books, have you tried to print a chart of accounts list alpha by account name?

If you have use account numbers selected in Company Preferences it doens’t work so well.  Here is a work around.

Go into Edit – Preferences, click on Accounting, click on Company.  Click off Use Account Numbers.  Save.

Go to Lists – Chart of Accounts.  Click the tab at the bottom of the screen Reports, then Account Listing.   

In Sort By click Account.  You can also click Modify Report and make this change.

With use Account Number off the account number will not print on the report by default.  If you want the account number click on Modify Report, then put the check box on account number.

Save the report by clicking on Memorize Report and give it a name.  You can save in a group or not.  

Later you can go to Reports – Memorized and print the report at any time. 

Go back to preferences and click back on Use Account Numbers and Save.  This will not affect the modified report.

Posted in QB Enterprise | Tagged | Leave a comment

Quick Books how to process a credit card payment for a posted invoice.

Post a payment against a customer invoice:

1) On the desktop click on the work flow icon Receive Payments, or click Customers on the top menu then Receive Payments.

2) Select in Receive From the customer.

3) Enter the amount received or click the invoice in the list.

4) Click Save and Close.

5) If you have the Intuit Merchant Services credit card solution activated the credit card processing screen will automatically launch at this point. The customer credit card information is defaulted.  Normally no changes are required on this screen.  You can enter a Memo and Reference number.

6) Finally print the receipt.   You can print the receipt to a PDF and email to the customer if required.

Posted in QB Enterprise | Leave a comment

Quick Books how to process a memorized transaction.

To process a memorized transaction:

1) Click on Lists or CTRL T

2) Double click on the transaction you want to process to open it.   You can also click on Enter to enter a new transaction if it does not exist.

3) Review the transaction and click Save and Close.

4) The transaction is now posted.  The next date is automatically updated by the system.

Posted in QB Enterprise | Leave a comment

Cannot access Quickbooks company file, error 6177, error 6190 -816, etc.

You are unable to access your Quickbooks company file in a multi user environment. Have all users exit Quickbooks.  On the server or workstation where the company files are located launch the Quickbooks Database Server Manager.  Click Scan to rescan your company data folder where your quickbooks data files are located.  Make sure your Quickbooks company file in question is found.

Lauch Quickbooks again and try to access the company file and switch to multi-user mode.

If you are unable to access the company file and are receiving errors 6177 or 6190, etc. delete or rename the .tlg file and the .nd file for the comapny file in question on the server or workstation.

The tlg file is a transaction log file and the nd file is a text file used for multi-user access.  Deleteing or renaming both these files will not harm the main comapny file which has a QBW extension.  Do not delete or rename the QBW file.

After deleting or renaming the company file launch Quickbooks again and try to access the company file. 

It’s a good idea to Rebuild data under Utilities.

Make sure to swtich to multi-user mode.

If you continue to have this problem your company data file may be corrupted.

Posted in QB Enterprise | Leave a comment

Quick Books registration error. Maximum number of days allowed on this copy expired.

Here is the best way to register Quick Books.  You have previously entered your product code but now you must enter your validation code.

When asked to register click Register Later.

Then click on Help, and About Quickbooks Enterprise.

When the splash logo comes up, hold down the Ctrl key, then hit R and P, enter the validation code and save.

 That’s it.  Piece of cake.

Posted in QB Enterprise | 1 Comment